“You only get one chance to make a first impression.”
Ever heard that before?
I’m sure you have. I thought everyone was familiar with that important maxim. That’s why I am constantly surprised and dismayed by the number of Facebook Pages out there making terrible first impressions!
If you manage a Facebook Page or want to create one, here are three things that can make or break your Page, make you look like a pro or an amateur, make you look silly or serious.
More importantly than image, the following three items on your To Do list will mean the different between a potential fan visiting and Liking your Page, or immediately leaving to go on to the next.
1) Design a great Cover photo.
The Cover photo is the first thing people see when they visit your Facebook Page. It takes up the most room, and is featured in the most prominent location. It is by far the most important thing on your entire Page.
I am mystified by the number of Pages, even some by so-called “social media experts”, that do not have a Cover photo at all! Not having a Cover photo is akin to not having an email signature. It’s like not having a photo on your Twitter bio or your LinkedIn profile. How do I know you are there? How do I know you are real? How do I know your Page isn’t a ghost town?
People simply will not spend the time on your Page searching out what you do without a compelling Cover photo. You may have half a second to make this impression before a potential Fan gets bored, or confused, and clicks away.
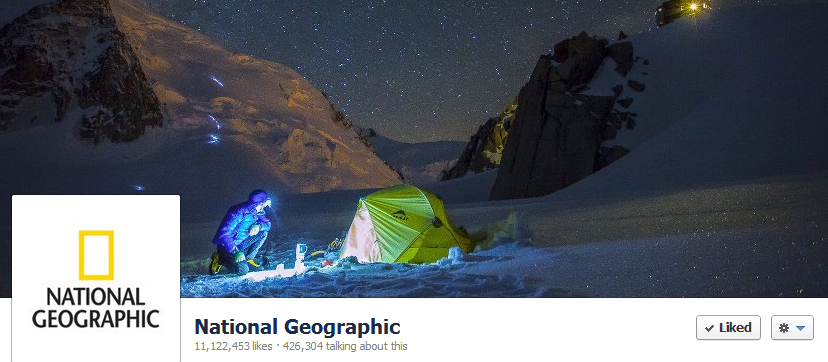
National Geographic is getting it right – A wonderful, interesting Cover photo (notice no text) that draws you in and immediately tells you something about them, juxtaposed with a clear Profile Picture of their logo and name. Pretty much perfect.
Tips:
- Make sure to check to see how your Facebook Page and Cover look on mobile devices.
- Do not post a stretched out version of your logo, or the same photo that you use for your Profile Picture.
- Do not post a pixilated, grainy photo or something clearly ripped off from Google Images.
- Get Photoshop and create a cover photo, or use a free web service like Pixlr.com – you do not have to be a graphic designer to do this.
- Make sure to size it correctly (851 pixels x 315 pixels).
- Please, please, follow Facebook’s clearly stated policies of what is acceptable and what is not on a Cover photo.
- Change your Cover photo at least once a month. This will show up in your Fans’ News Feeds and will drive more traffic to your actual page, where people are checking out your (hopefully) compelling and interesting photo.
For ideas and inspiration: 20 Awesome Facebook Cover Photos from Jeff Bullas.
2) Maximize the About section.
The About section is the small block of text that appears below the Cover Photo. It may be the only thing people read when they come to your Page, so make sure that it’s short, sweet, catchy and lists your website URL and phone number. To edit the About text, go to Edit Page –>Update Info –>About.
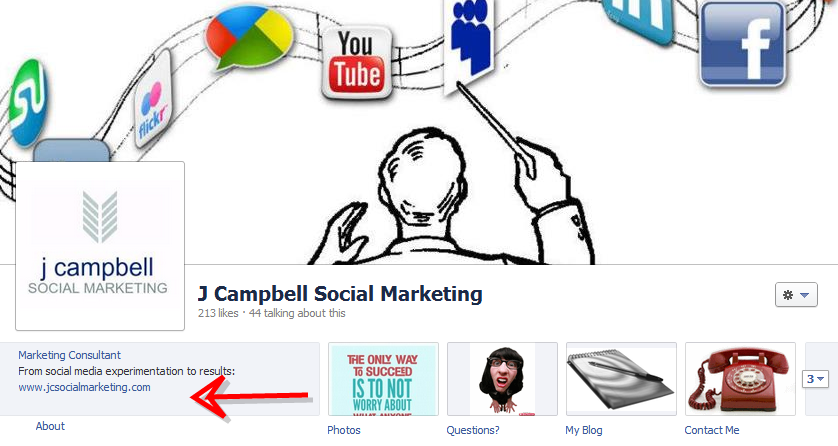
While I am far from perfect, I try to utilize the small space in the About section to my advantage – my Category (“Marketing Consultant”), a short tagline (“From social media experimentation to results”) and my website URL.
Tips:
- Ensure that you are categorized correctly! That will make it easier for people to find your Page. Go to Edit Page –> Update Info –> Category.
- Make sure there are no spelling errors and that any links listed actually work.
- Do not cut and paste the “About” section of your website!
3) Personalize the graphics and icons on your top 3 Tabs.
The Tabs are the boxes below the Cover photo, adjacent to the About section. Tabs can be completely customized – you can change the 3 Tabs next to Photos (Facebook won’t let you alter the Photos Tab in any way – at least for now). You can also add more Tabs underneath.
When the Tabs on a Page are customized, you can tell. (See Inbound Zombie’s Tabs, below.)
It looks nicer. It makes that Page look more organized. It lets the viewer know what they are supposed to do (besides “Like” the Page of course). Nothing grabs someone’s attention more than a bright red button with the word Free on it!
Determine the top three things you want Facebook Fans to do. Sign up for your email newsletter? Add a Constant Contact form. Make a donation? Add a link to your Donate Now page. Visit your blog? Link to it or embed it in your Facebook tab.
You can add up to 10 Custom Tabs to your Page (I’ve never seen a Page with that many). In reality however, People are not likely to explore your other Tabs – they probably don’t know that they can click on the arrow and get more! So, make sure the top 3 Tabs, alongside the static Photos tab, are kicking butt and taking names.
Tips:
- ShortStack is my preferred application to create free, customized Tabs that are easy to add to your Page. Pagemodo is another option.
- Iconfinder.com can help you find icons sets to use.
- Pixlr.com will help you edit and resize photos to use as graphic icons on your Custom Tabs.
For a very helpful step-by-step guide to creating custom tabs for Facebook, watch this video by The Nonprofit Facebook Guy.
Conclusion: Remember the cold, hard reality of Facebook fan-dom – the majority of your fans visit your Page once, they Like you, and then never visit your Page again. (They are hopefully getting your Posts through their News Feed, more on that in other posts.)
You have one chance to make a great impression – why waste it?
What other ways have you found to make a great first impression on Facebook? Anything I missed? Please leave your thoughts in the Comments section. Thanks for reading!


Comments 1
Pingback: Fan Logos & Cover Photos - Disside Design Lab